Cleaning Guide: The Volcano
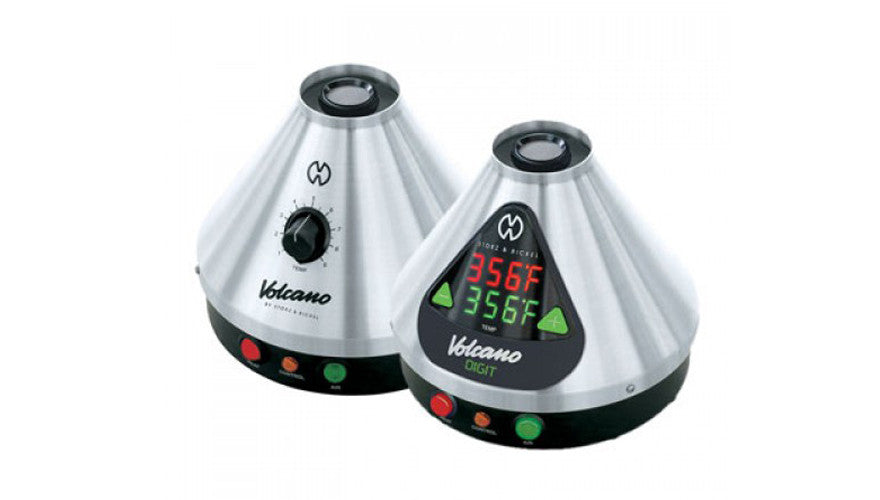
The Volcano vaporizer by Storz & Bickel is one of the easiest units to clean and own. With proper care, your Volcano’s parts should last a long while, providing you with great tasting vapour for years to come. Of course, no unit is completely maintenance-free, and some cleaning will be needed. Cleaning the Volcano vaporizer will not only keep it running efficiently, but will also protect the vapour quality and flavour.
The easiest and most practical way to care for your Volcano is to clean all parts whenever you change the bag over, which can be anywhere between fortnightly to once a month depending on how often you use it.
Note: All over the Internet, people recommend using Isopropyl alcohol to clean your Volcano vaporizer. In their user manual, Storz & Bickel state that you should never submerge the plastic and rubber parts of your Volcano valve set in alcohol. It is okay to quickly wipe or rinse these parts with alcohol, but prolonged exposure may lead to discolouration of plastic parts and make them brittle. If you must soak your Volcano’s plastic parts, use a gentle organic cleaner or some dishwashing detergent instead.
What You’ll Need:
- Cleaning brush or cotton buds
- A soft cloth
- Isopropyl alcohol (optional)
- A gentle, non-abrasive cleaner
- Hot water
- Small pliers
- Tweezers
Cleaning the Volcano Base Unit:
The Volcano unit itself doesn’t need much care at all. If it does get dirty or stained, the stainless steel outer surface can be cleaned with a soft damp cloth. Don’t use anything abrasive on it, and definitely DON’T use alcohol! A mild soap will be more than enough to clean any spots that can’t be removed by water alone.
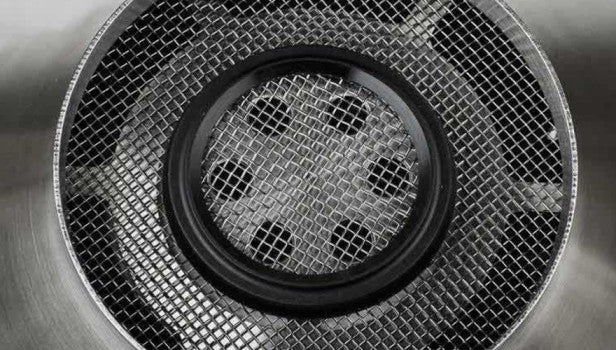
The Volcano does contain an air filter located in the bottom of the machine and this should be inspected for contamination whenever you do a routine cleaning. Replacement sponges should have come with your unit, and can be changed over by turning the air filter cap counter-clockwise and pulling it out.
NEVER disassemble your Volcano unit or open it up to clean the inside. This will void your warranty and isn’t necessary, as botanical particles shouldn’t be able to get inside.

Cleaning The Solid Valve Set:
If you have the Solid Valve set, the mouthpiece, valve and filling chamber will need to be completely disassembled for cleaning. Good news – the plastic components for the mouthpiece, valve and filling chamber can all be cleaned in your dishwasher! Unfortunately, smaller parts like washers, screens and rubber O-rings are likely to get lost so it’s recommended to clean these by hand.
The challenge when cleaning your Solid Valve set is disassembling everything and remembering where each component goes so you can piece it back together correctly. This is easy if you can keep the components lined up in the order they’re meant to be assembled, or just detach and clean each part one at a time.
A Guide to Disassembling Your Solid Valve Set:
Mouthpiece:
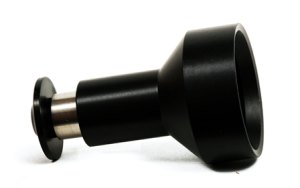
To take apart the mouthpiece, simply pull the lip piece (the black tip) off the metal cylinder and then slide the cylinder from the housing. This can be tough; don’t be afraid to pull hard!
Balloon Valve:
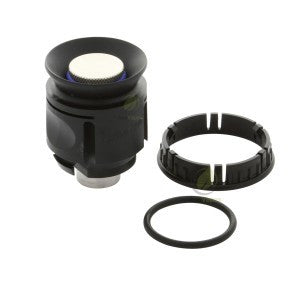
The balloon valve is the most complicated component that you’ll have to take apart as it contains the most parts. The balloon valve is also likely to get sticky with resin, particularly if you wait longer between cleanings. This can make it hard to unscrew parts like the valve cap. If you do find your parts are stuck together and hard to separate, placing them in some hot water will help to loosen the bind.
It may look a bit complicated, but the balloon valve can be disassembled in a few easy steps
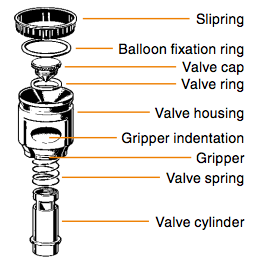
- First, remove the balloon by loosening the big plastic slip ring and then sliding the balloon fixation ring from the valve housing and detaching it from the bag.
- Dispose of the bag, making sure to set these two O-rings aside. You can clean these rings if you wish, but they’re not likely to be too dirty.
- Next, use your finger to push the valve cylinder up from the bottom of the valve housing until you can unscrew the valve cap
- Once the valve cap is off, you should easily be able to remove the blue valve ring
- After this is done, the valve cylinder and spring will pop out automatically. Separate them for easier cleaning.
- Remember where all these components go so that you can put them back together the correct way (in the reverse order you took them apart)
Tip: to get the spring/cylinder back into the plastic valve housing, you will have to insert the spring into the housing first!
Herb Chamber:
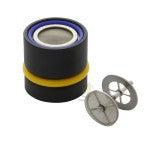
You should brush out your herb chamber after every time you use your Volcano to keep it clean and free of particles. Doing this regularly will keep your chamber cleaner for longer and also eliminate the possibility that vaped particles in the chamber will burn and affect the taste of your vapour.
When you do a routine clean of your Volcano, you should completely dismantle the herb chamber for a more thorough cleaning. The chamber insert and screens will accumulate resin that can build up underneath screws and tiny cracks, making it impossible to get to or even see without taking the whole component apart. Any resin build up can be scraped off or dissolved with alcohol.
Taking apart and cleaning your herb chamber is extremely simple and can be done quickly in just a couple of stages:
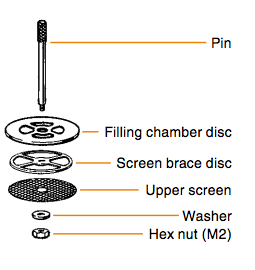
- First, remove the filling chamber insert and unscrew the hex nut at the bottom using some small pliers, the rest should come apart easily. Please note that the hex nut and washer are both incredibly tiny and easily lost, so make sure you put them in a safe spot while you take apart the rest of the chamber.
- Next, grab the herb chamber and gently push the bottom screen out with your finger, being careful not to misshape it too much. You can either clean your existing screen or replace it with a fresh one.
- Use tweezers to pull the large blue O-ring off the end of the filling chamber housing. This should allow you to then remove the metal cylinder from the plastic housing.

Cleaning Your solid valve parts:
Once you have all the parts disassembled, they can be cleaned using warm soapy water (or wiped quickly with Isopropyl alcohol) and the included cleaning brush, or a cotton bud/soft cloth.
If you’re confident that you can put all your components back together correctly, screens and metal parts can all be placed in a zip lock bag with some Isopropyl alcohol and shaken. This method can be used for the mouthpiece cylinder, balloon valve cylinder and spring, valve cap, filling chamber cylinder and all the parts for the filling chamber insert. You can use the same method for your plastic parts soaked in a gentle cleaning solution. Any stubborn debris that doesn’t come off with soaking can be scrubbed from the surface using the cleaning brush.
Make sure that you rinse all components thoroughly in warm water afterwards to remove any residual cleaner/alcohol from their surface. Once all parts are dry, reassemble them in the reverse order they were taken apart. You can use the instruction manual for help if you get stuck!
Easy Valve Set:
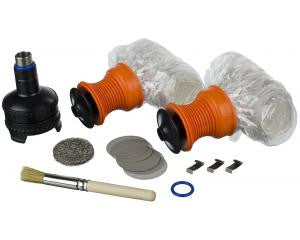
The Easy Valve mouthpiece and balloon don’t need any maintenance. They are designed to be disposable and should be replaced every few weeks for hygienic reasons.You can buy a new Easy Valve Set online. You will, however, need to dismantle and clean the filling chamber regularly. The filling chamber should be brushed out after each use and thoroughly cleaned whenever you replace the bag. This will keep your vapour path hygienic.
Cleaning the Easy Valve Filling Chamber:
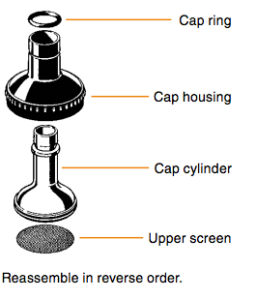
Cleaning the chamber is easy and convenient to do. To disassemble the chamber, first take apart the cap by pushing the screen out from the top. You can do this by pushing the handle of your cleaning brush (or a pen) through the cap cylinder until the screen pops out the bottom. Then, remove the cap cylinder from the housing by pushing it down. The cap ring should come off at the same time.
Tip: When re-assembling, the upper screen has to be placed carefully into the intended notch. Failure to do this can leave openings for plant particles to travel into the balloon to be subsequently inhaled by you.
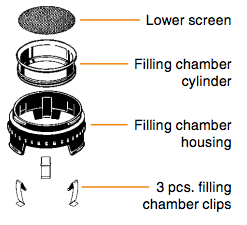
The lower screen or liquid pad can simply be pushed out. Removing the filling chamber cylinder from the housing will automatically release the filling chamber clips.
Clean all of these components with a mild cleaner or wipe with some Isopropyl, using the cleaning brush or a cotton bud/soft cloth. The cap cylinder, filling chamber clips, filling chamber cylinder and both screens can all be soaked in Isopropyl alcohol if they have accumulated stubborn residue. If you find you need to soak the filling chamber, cap housing or cap ring, it’s best to use a mild cleaner or dishwashing detergent to avoid damaging these parts.
Rinse with warm water to wash off any residue. Make sure that all components are completely dry before you re-assemble them, and that you put them back together in the correct order (your manual will help!)
Cleaning the Balloon Bags:
Don’t bother trying to clean and re-use your Volcano bags – they’re designed to be disposable, and exposing the inside to any chemicals will just affect the purity and flavour of your vapour. Just fit a new one!
Replacement bags for the Volcano Solid Valve and Easy Valve sets can be found on our website.
Fitting a New Bag:
If you own the Solid Valve set, you will have to fit new bags onto the valve yourself (the Easy Valve sets come pre-assembled.)
Fitting a new bag is fairly simple but can be fiddly. If your bag isn’t fitted straight, you may notice that the bag leans or falls over when you fill it. These steps will talk you through fitting a perfect bag every time:
- Detach the old bag by removing the large plastic slip ring and black rubber O-ring. Set these two rings aside and dispose of the bag.
- Cut a length of new bag material approximately 50-60cm in length. You can use the Volcano bag tubes or an odour-free, food safe oven bag (the bonus of using an oven bag is that, when you need to replace it, you can cook with it to infuse your food!)
- DO NOT use any other kind of plastic bag on your Volcano, unless you’re fond of cancer-causing chemicals.
- Tie the bag off at one end. Each length of Volcano bag should come with an additional strip of plastic that you can use to tie off the end. If yours is missing or you use some other kind of bag that needs to be tied, cut a small strip off the end of the bag or use anything that will create a tight and leak-proof seal. (Tip: plastic twisty-ties, zip ties and dental floss work very well.)
- Once you have the bag tied off at one end, you will need to attach the open end to the balloon valve. Here lies the tricky part!
- Take the balloon fixation ring (the flexible rubber O-ring) and gather the bag so that you can slip it on. Slide it down about 3cm from the edge of the bag.
- Attach the ring to the balloon valve.
- This is the important part – because your bag is so much wider than the valve, it needs to be folded and gathered to fit. If your bag isn’t gathered evenly, this will result in leaning when you try to fill it (not a big deal, just slightly inconvenient.) Work slowly around the edge of the bag, making sure to fold it down evenly all the way around.
- Test whether your balloon is on straight by holding the balloon up by the tied end. If the valve hangs straight down, you’ve done it right!
- Once the balloon is on straight, you can attach the slip ring and carefully trim any stray edges from the bag collar.
- Voila! You’ve done it! Reward yourself with a tasty vaping session.


The post Cleaning Guide: The Volcano Vaporizer appeared first on Australian Vaporizers Blog.


